21 January 2015

Playing Dress Ups #1: Little girls winter dresses

This post may be a little late considering we're now halfway through January. But where I live the snow is just starting. It's going to be at least a good couple of months tip we'll be out of anything long sleeved. And since my girls are growing like sprouts, I figured a few extra winter dresses couldn't go amiss. Here are my favorites at the moment:

1. Printed Navy Sweatshirt Dress / Esprit - €29,99
2. Coral Stripe Dress / Blue Seven - €13,95
3. Blackberry Cotton Dress / Mexx Baby - €25,99
4. Turquoise 'Tamtam' Jersey Dress / Oilily - €59,95
5. Navy Striped Dress / Marc O'Polo - €59,95
6. Pink 'Dazy' Dress / Oilily - €89,90

If I had money to burn, I would definitely go out and buy that turquoise Oilily dress for both my girls.  It's just adorable. A mum can dream, right? If that's not your colour though, don't worry, they have a tonne more! Their site is definitely worth checking out! Even if just to peruse. (They also have some super cute bags, and for more reasonable prices. But more on that in a later post...)

But anyway, I'm loving these dresses at the moment. And don't worry if the prices shock you! I was able to find most of them for half price online. And yes, I bought the top three. And am dreaming about the other three... 
As far as little girls sizing goes, I'm always at a loss. I ordered dress #2 in size 74 (9-12m) thinking it was actually for 6 months. Oops! My annoyance didn't last long though when I soon figured that it fits my 2-year-old! I know she's not the biggest 2-year-old on the block but come on! 9-12 months!? So actually I scored a double win because now both of my girls will get good use out of it. One happy mum right here!

Ps. I'll be back soon with a baby/nappy/diaper bag post.

Emelia xx


Voids & Nubs

Fun fact #591. Voids and nubs are the technical terms for the innie and outtie parts on puzzle pieces. Fun!
You'll thank me later.

Instead of sinking into the couch, putting up my feet and flicking on a movie -like most normal gals- after a solid 12 hours of serious toddler play (Dear baby stage mother, you have no idea) and a ravagingly hungry baby...I admit it....I have a pensioners fancy for puzzles. Yes, those ridiculously big ones. Yes, I could be going out and living an actual life.

Honestly though, I just can't help myself.

But before I ramble on and on blissfully unaware that you've left, let me show you what I'm trying to get at here:

See what I mean?

I don't even care if you like puzzles or not, you now know what I'm talking about. If you like anything frilly and ribbony this is your candy shop. Don't you just want to leap in there and bundle all those goodies in your arms and start singing "I feel pretty! Oh, so pretty!" at the top of your lungs while swooning with the fabric rolls?
No? Just me?
Okay then.

"I feel pretty! Oh, so pretty! That the city should give me its keeeeeeeeeeeeeeeeey!!!!"


When I was a kid, we had a clock shop puzzle. It had 1000 pieces and pretty much the coolest thing I can remember ever doing. Fun childhood, you say? You bet! It had a gazillion clock faces and I just loved that small glitter of accomplishment every time one piece fit into another. I also had a lot of patience as a child to do such things. I could sit for hours doing seemingly boring things to everyone else, which I found absolutely fascinating. I was also the type of child who lined up all her colouring pencils in rows according to their colour. Today, some would probably call it racist. I must of had a lot of pencils come to think of it, because the Red family consisted of about ten nicely sharpened heads and the black family was about seven strong. The yellow family was very short. The Greens were all very different shades. The Blue family were my pride and joy. The Purples had just adopted baby rose. The Browns were quite a small family. The Nudes even smaller. And my most favorite of all, the lilac and white striped Stabilo Grandpa. He didn't have anyone else so he became the patriarch of all pencils. I had hours of fun with my pencil families and I wouldn't have traded those times for anything. Not even the latest Barbie.

I had to put this one in. It reminds me of Downton Abbey. Or better yet Upstairs Downstairs.

I guess what I'm trying to say is, a simple life can be beautiful. If you want it to be.

So instead of opening up the laptop to watch another episode of heart-numbingness or scrolling through that can'tlivewithout-newsfeed on your phone, why don't you go and dust off an old puzzle. Sit on the living room floor in half awe and half dazed because you've just realized that the world is more beautiful than you ever thought possible from down here.

And don't forget to check out some other pretty puzzles here :)

Emelia xx

13 January 2015

DIY Sylvanian Dollhouse {Part 3} - The Reveal


Psst... click to see Part 1 and Part 2 of this project

Welcome back to the final reveal of our DIY Sylvanian Families dollhouse! I'm excited to put it mildly. I must admit my husband has already caught me a couple of times sitting in front of the dollhouse, wishing I could walk straight through that front door. Slash opening. I'm pretty happy with the way it turned out but there's still a few things I wouldn't mind tweaking. Maybe even change up the wallpaper. Stain the roof. Add shutters. And the list goes on. But no. For now it remains as is. And I'm happy. Hey, perfection isn't what I was looking for.

So let's start the tour!


Let's start at my favorite room, the sunny kitchen, and then work our way up to my second favorite, the kids bedroom.

KITCHEN:

The kitchen is my all time favourite. I wanted to make it bright and friendly so I went with Hula Hoop from the Dear Lizzy Daydremer Collection as the back wallpaper.


The bright yellow also makes the Sylvanian kitchen set (worth every penny!!) look extra cute. Don't you just love that tea set?? One day I would like to get this Lundby Smaland dining set. But that will have to wait for now...I don't think the piggy bank will allow it just quite yet.


I already talked about the tiled flooring in the kitchen in my last post but I'll mention it here too because it's just too adorable not to ;)

The little stools found here in the kitchen and in the Master bedroom, I made out of secondhand Playmobil stools I find on Ebay. Playmobil is just a tad smaller than Sylvanians so I needed a way to make them a little bigger. So using a fabric button maker to make a couple of buttons out of scrap fabric I had on hand and then just stuck the buttons on the stools and voila! A cute little dollhouse stool :)


LIVING ROOM:


The wallpaper in here is Aqua Skies from the Jen Hadfield Homemade Collection via Pebbles Inc. The sofas I made using this photo tutorial. The fabric is from the Tilda collection, available in almost all countries but the US (Sorry guys!). The wooden sofa is from an old dollhouse set that my husband had when he was a kid. Cute huh?! I then just made a little cushion to go on it.


The round mat is just plaited yarn round around on some doublesided tape at then stuck onto some felt. The little pink HOME mat at the front door, I made using a piece of that anti-slip mat stuff you put under carpets and furniture. I then just did a few cross stitches in it. You can also use those little plastic cross stitch things. Sorry I have no idea what any of that is actually called lol. And the cats I got second hand on ebay. They're Playmobil. 

MASTER BEDROOM:


My least favourite room. I have this constant nagging feeling it needs more work. But the wallpaper is pretty. It's Pretty Parkway from the Dear Lizzy 5th & Frolic Collection. The little baby bed and set of drawers are from the same old set as the wooden couch. I just painted a little heart on the bed and made a little mattress to go in it. The bed I made myself with a bit of cardboard, Styrofoam, fabric and ribbon. 

BATHROOM:


My daughter is in love with this room. The washing machine and toilet are the highlights. The bathroom tiles are from here.


The wallpaper is Flora from Amy Tangerine's Stitched Collection. 

KIDS BEDROOM:


LOVE! I just love the simplicity of this room. The wallpaper is Beautiful Bliss from the Cut & Paste Collection via My Mind's Eye. The little beds are from here.


The Lundby Smaland toy set in the children's bedroom the girls got at Christmas for the new dollhouse from their aunt and uncle. A complete surprise! And they fit so perfectly in there! It was meant to be.

And no tour would be complete without a quick look at the roof.


All that glueing, so worth it!

So there you go! I hope you enjoyed our little dollhouse tour. Feel free to comment or let me know how you think I could change up the Master bedroom (or any other room for that matter) to give it that something more.

Emelia xx


02 January 2015

DIY Sylvanian Dollhouse {Part 2}

Welcome back to part two of building a Sylvanian Dollhouse. Unfortunately I'm one of those people who forget to take photos at all the right moments. Hence me putting together a baby book of our oldests first year and figuring I have no (no, not one) photos of my one-year-olds birthday. Lost in the moment you could say. So the My First Birthday caption is now nicely paired to one of the many bath pictures that was roughly (by a month or so) taken around her birthday. Oh but I have a photo of the cake.

So you'll have to bare with me, I'm afraid. If it wasn't for the husband, this would be a photofree post.

ANYWAY...

This is what we came up with:

A simple design with no stairs or ladders as I figured they're just a waste of space anyway and what child really uses the stairs with their dolls anyway. As you can probably also see, there's also no inner doors. We wanted to cut down the jigsaw work to a minimum since we didn't have much time to get this thing completed and we don't have a jigsaw of our own. So we just set the inner walls back a bit so the dolls can...um...walk around the front. It's all about open plan here ;)

The measurements are as follows: The base board is 50cm wide x 25cm deep. The other two floors above are 50cm wide x 20cm deep. The two inner walls are 20cm x 20cm. The two outer walls are 20cm wide x 45cm tall. The two roof pieces are 20cm wide x 35cm long. The backboard measures 50cm wide x 75cm tall (Cut to size).

We used 9mm plywood for the all the floors, walls and roof and 4mm plywood for the back board.

After cutting all the pieces to size (apart from the backboard, which we waited until the house was finished to cut) we then measured and cut out the three windows and door with a jigsaw. Here's a quick youtube tutorial on how to cut out windows with a jigsaw. We also cut the top of the two outer wall pieces and the ends of the roof pieces where they will join at a 45 degree angle. You can see the 45 degree cut on the outer walls in the picture below. I then spent an evening sanding down all surfaces, edges and corners for a smooth finish.

Building. Just let me tell you, building a dollhouse as a husband-and-wife team will be more equipping than any marriage seminar you'll ever go to. Tears were shed. Eyes were rolled. Thumbs were hammered.

Halfish way there. I'm not even going to go into how and which way we put it all together. Because I have deleted it all from my memory. All I can say is, our method could have been better.

Painting and Staining. Once the roof was on I needed to fill a few small gaps between the roof and walls with a bit of filler before I could start priming. But before I could prime I taped all the edges and covered the living room, master bedroom and childrens bedroom floors with paper, so that they wouldnt be spoilt from paint drops. I did two coats of primer and 1-2 coats of semi-gloss white paint. After ripping up all the tape and paper I then stained the aforementioned rooms in chestnut brown.

After paint job and staining.

Flooring. While browsing through dollhouses on pinterest I saw that one woman had used vinyl tile sheets in the bathroom and kitchen. I was able to find the exact tiles I wanted for the kitchen here. Sadly the hexagon tiles I had fallen in love with wouldn't ship to Europe so I had to be content with these square ones. I then cut the tile sheets to size and taped down with carpet double-sided tape. You could also glue them down but I wasn't quite ready to make that sort of commitment with my dreamhouse tiles.

Painted, stained and tiled...well...half-tiled. The bathroom sheet still needs to be stuck down here.

Edging and Roofing.  After seeing this house and this house with their beautifully tiled roofs, I knew that's what I also wanted to do. So I packed up the girls and took a trip to the hardware store in search of paint stirers...to no avail. Well I did actually find some...one to be precise. And at the price of around 2€ PER!! stick which I would be needing around 40 of, I decided to go elsewhere. So after coming home a little depressed from my pointless outing I went online to see if I could get a better deal. Ebay came to my rescue with a box of 50 for only a few euros. I then cut (with a handsaw!) each paint stirrer into 4 pieces and started glueing. Using wood glue I started glueing from the bottom of the roof in rows til I reached the top and then did the same on the other side. Oh and before I did all that, I used a bit of trim which I cut, painted and glued to the edges of the roof. As seen below.

The paint stirrers waiting to be cut.

Half-way done. Ignore the wonky window shutters.

Wallpapering. Unfortunately I didn't get any photos of this step. But it's not rocket science. I just bought a few scrapbook pages online and modpodged them onto the back board. Although I did get a really good tip from here on when to paint/wallpaper/modpodge the backboard. Defintely do it before you nail it on to the back of the house. Makes life a whole lot easier. No need to get into all those nooks and crannies with your paint brush or if you're wallpapering/modpodging like we did, then you will get MUCH cleaner lines around your edges. 

So I think that's basically that. Next time I'll be back with the big reveal. Until then!!

Go to Part 3

01 January 2015

DIY Sylvanian Dollhouse {Part 1}

It's been almost 2 years since my last post on here but this project will make up for it. I promise.

We decided this year for christmas to build a doll house for our two year old. As a child I shared a Sylvanian Families doll house with my older sister. It was just two rooms and quite cramped with all the furniture and animals. But we LOVED it. 

So after looking at the Sylvanian Families houses on the market at the moment I figured that they were either too small for (at least) two little girls or far too expensive. So I started hunting around for some ideas on Pinterest. When I came across a dollhouse kit which was a little pricey and would be a heck of a lot of work but oh my is she lovely!

by Erin Mccall
But after letting my husband know that I'd found my dream home, he told me that he wanted to build it himself. from sctrach. I'm not gonna lie, my heart sank just a little... but then I realized the ENDLESS possibilities that entailed. Sure babe!! Let's do this! So back to the drawing board I went. Well, pinterest. Some houses it was love at first sight and I wished I could shrink myself and move in right away. Move aside Barbie this place is mine!! and others were....well...lacking. Honestly though, if you're going to go to the effort of building a whole dollhouse from scratch you might as well put at least a thought into the decorating. brrr. Those pins I will not be sharing. But anyway, if you've ever searched for 'DIY dollhouse' these pins will not be new to you. The good, the bad and the downright ugly. But hey, there was light at the end of the tunnel and these were my favourites:

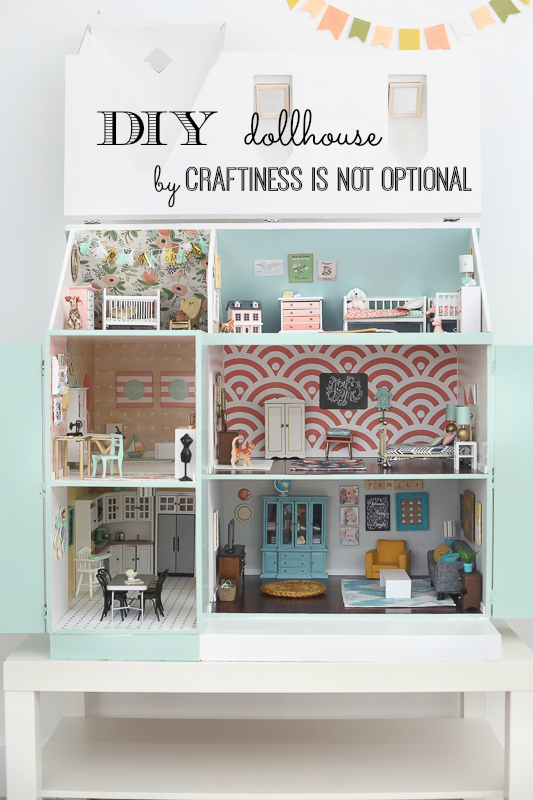
by Craftiness Is Not Optional

by Sew Much Ado

by The Handmade Home
One and three are my absolute favoutites from the favourites so I drew up a few quick scetches to combine the two and came up with a pretty good draft which even got the approval from the husband. Score!

Go to Part 2

17 January 2013

Coffee Coaster Upcycle

Or should I say Tea Coaster?

I don't drink coffee. Never do. Never will. It's bitter and foul. Although I do love the smell, and that's enough for me. I just drink the smell. If only it tasted that way. Oh well, I guess I'll just stick to tiramisu.

Anyway...back to the coasters. We have a new coffee table (more on that later). Our old one was OLD, so we never much cared what stains and scratches it got. But now, after my semi-hardwork on our new DIY coffee table I decided we needed new coasters. I had some lying around in my kitchen that I'd bought I while back. Didn't much like them at the time and like them even less now. So I thought I'd give them a quick potchup. And voila! New coasters.

Yes, that's the NEW table. Each to their own?


15 January 2013

#1 Babywise update: 12 weeks

Baby is now 12 weeks. How's my attempt at Babywise going? Grand! Got off to a bumpy start because she was one month premature and needed a little more peppering. But with that said, she started sleeping through the night at 9 weeks. She's now on a 3-4 hour routine which is working pretty well. AND I've already had numerous comments saying how content, happy and placid she is. I'm her mother, and I know it's not all just to do with her character ;)