
So you'll have to bare with me, I'm afraid. If it wasn't for the husband, this would be a photofree post.
ANYWAY...
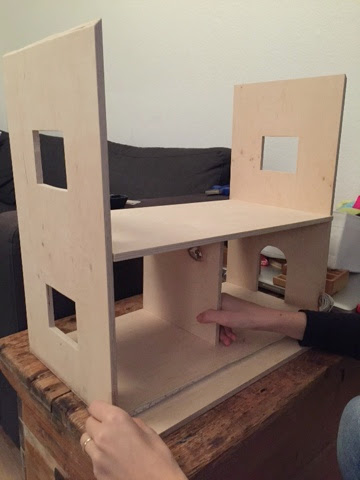
This is what we came up with:

A simple design with no stairs or ladders as I figured they're just a waste of space anyway and what child really uses the stairs with their dolls anyway. As you can probably also see, there's also no inner doors. We wanted to cut down the jigsaw work to a minimum since we didn't have much time to get this thing completed and we don't have a jigsaw of our own. So we just set the inner walls back a bit so the dolls can...um...walk around the front. It's all about open plan here ;)
The measurements are as follows: The base board is 50cm wide x 25cm deep. The other two floors above are 50cm wide x 20cm deep. The two inner walls are 20cm x 20cm. The two outer walls are 20cm wide x 45cm tall. The two roof pieces are 20cm wide x 35cm long. The backboard measures 50cm wide x 75cm tall (Cut to size).
We used 9mm plywood for the all the floors, walls and roof and 4mm plywood for the back board.
After cutting all the pieces to size (apart from the backboard, which we waited until the house was finished to cut) we then measured and cut out the three windows and door with a jigsaw. Here's a quick youtube tutorial on how to cut out windows with a jigsaw. We also cut the top of the two outer wall pieces and the ends of the roof pieces where they will join at a 45 degree angle. You can see the 45 degree cut on the outer walls in the picture below. I then spent an evening sanding down all surfaces, edges and corners for a smooth finish.
Building. Just let me tell you, building a dollhouse as a husband-and-wife team will be more equipping than any marriage seminar you'll ever go to. Tears were shed. Eyes were rolled. Thumbs were hammered.

Halfish way there. I'm not even going to go into how and which way we put it all together. Because I have deleted it all from my memory. All I can say is, our method could have been better.

After paint job and staining.
Flooring. While browsing through dollhouses on pinterest I saw that one woman had used vinyl tile sheets in the bathroom and kitchen. I was able to find the exact tiles I wanted for the kitchen here. Sadly the hexagon tiles I had fallen in love with wouldn't ship to Europe so I had to be content with these square ones. I then cut the tile sheets to size and taped down with carpet double-sided tape. You could also glue them down but I wasn't quite ready to make that sort of commitment with my dreamhouse tiles.

Painted, stained and tiled...well...half-tiled. The bathroom sheet still needs to be stuck down here.
Edging and Roofing. After seeing this house and this house with their beautifully tiled roofs, I knew that's what I also wanted to do. So I packed up the girls and took a trip to the hardware store in search of paint stirers...to no avail. Well I did actually find some...one to be precise. And at the price of around 2€ PER!! stick which I would be needing around 40 of, I decided to go elsewhere. So after coming home a little depressed from my pointless outing I went online to see if I could get a better deal. Ebay came to my rescue with a box of 50 for only a few euros. I then cut (with a handsaw!) each paint stirrer into 4 pieces and started glueing. Using wood glue I started glueing from the bottom of the roof in rows til I reached the top and then did the same on the other side. Oh and before I did all that, I used a bit of trim which I cut, painted and glued to the edges of the roof. As seen below.

The paint stirrers waiting to be cut.
.JPG)
Half-way done. Ignore the wonky window shutters.
Wallpapering. Unfortunately I didn't get any photos of this step. But it's not rocket science. I just bought a few scrapbook pages online and modpodged them onto the back board. Although I did get a really good tip from here on when to paint/wallpaper/modpodge the backboard. Defintely do it before you nail it on to the back of the house. Makes life a whole lot easier. No need to get into all those nooks and crannies with your paint brush or if you're wallpapering/modpodging like we did, then you will get MUCH cleaner lines around your edges.
So I think that's basically that. Next time I'll be back with the big reveal. Until then!!
Go to Part 3
Go to Part 3

No comments:
Post a Comment